Tuesday, January 31, 2017

VSD Project
This last month I took Visual Development course at Full Sail University.  During the past four week we studied linear light and render workflow.  Over the course of the class we worked on UV layout, texture painting, lighting with Mental Ray area lights connected to blackbodies, and the new MILA Material.

Week One: Lighting and UV's
Matching reference images object position and lighting.  For this I created and image plane of the reference in Maya so that I could better match the position of each object.  The lighting was pretty sight forward mostly just switching between the last render and the reference image.  We also had to create UV's for the scraper.


Week Two: Texture Painting
We began the week laying out UV's for the pulley.  The UV layout for the pulley looked like it might be a pain in the butt, but it really took no time at all.  We then switched to texture painting.  We painted textures for the Pulley and Scraper.  For the Scraper I used the photos references given but for the pulley I found my own images and created a similar texture to the reference.


Week Three: MILA Material
We three was the most informative to me, I have been working in Maya for a long time but had yet to learn the new MILA Materials in Mental Ray.  I really like the MILA Material found it very easy to setup and extremely powerful, it's a much better solution than the older MIA_Material_X,  The Material works with a layering system, which allows you to create each effect of your shader as a different layer.


Week Four:  MILA Transmission and Render Layers
We four was very much like week three but we focused on creating materials that had Transmission.  Transmission is when light passes through an object.  We see these types of surfaces on Glass, Water, Diamonds ect.  After everything was all setup the render layers for each light and passes to have the most control in post.




Sunday, March 27, 2016

Zbrush: Creating A Tri-Part Insert Mesh Brush

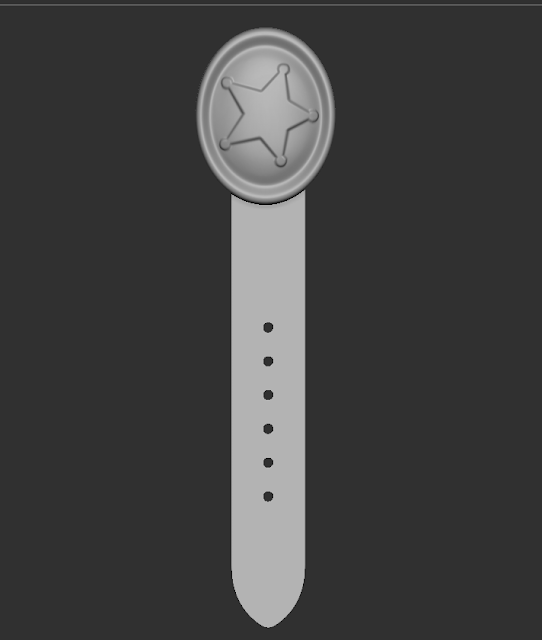
In this tutorial I will show you how to take a leather belt mesh and build a tri-part Insert Mesh Brush.  Ill append the newly created brush to an existing insert mesh leather belt brush that I created a earlier.  I have chosen to create a tutorial about this topic because It has been very useful in creating clean and consistence shaped belts that helped to add clean details to my finished sculpts.


Part 1 Build Leather Belt Mesh.
To build the belt mesh you can really use any software.  The only import parts to remember is that you need to have a beginning, middle and end section of your mesh.  For my belt the buckle will act as the beginning, the leather strapping will acted as middle and rounded end with holes will acted as the end.  Things to avoid when creating the mesh is heavy sub divisions.  Use enough division to make the mesh look smooth; if you find that your mesh is in the million polygon range before making it a brush; the polycount is too high.  


Part 2 Split the Belt in to Polygroups
Now that the mesh is ready we have to separate the 3 sections (Buckle. Belt and Belt End) into different Polygroups.  I found that starting with the middle section and masking it and using the group by mask is easiest place to start sectioning out the mesh into different polygroups.  To create a Tri Parts brush there must be three separate Polygroups.


Part 3 Orienting the Camera.
This step is super easy, just rotate the cameras so that the beginning mesh shape is positioned towards the top and end of the mesh is located at the bottom of the screen.   If you hold down shift while rotating the camera you can snap to the different orthographic view in Zbrush.


Part 4 Building the Brush.
Now it’s time to make the brush.  Start by clicking on the brush pallet and click Create Insert Mesh.  After clicking the button it will ask you if you want to append this brush to an existing brush or make a new brush.  If you have never made an insert mesh brush you would want to click new.  Since I already have an Insert Mesh Brush for leather belts I’ll click append and select the brush I would like to append it to.  


Part 5 Changing the Stroke to Curve Mode
If you tried to use the brush right now, the result would quite be what we wanted.  We need to change a setting in the stroke pallet.  We need the brush to use a curve so that we can drag a path for the brush to use.  You can find this option under the stroke pallet in a sub-pallet called curve.  Click on “Curve Mode”.  


Part 6 Final Adjustments. 
In the brush pallet we need to turn on the Tri Parts feature.  The Tri Parts feature will allow the brush to identify the beginning, the middle and the end.  The middle section will be repeated throughout the curve while the beginning and the end will only be used once.  The last setting we need to turn on is Weld Points.  This setting will make sure the belt is one continues mesh.  If you find that the brush look a little jagged you can increase the Curve Resolution in the brush modifiers.  For the belt I increased the curve resolution to four.

Finish by saving the brush.  There are many different types of leather belts you could create and store in one single insert mesh brush. In the image above I used two separate insert mesh brushes to create the cowboy bullet belt.  

Monday, December 28, 2015

Arm Sculpt Project

Arm Sculpt Project for CDC 

My last project for Character Design and Creation at Full Sail University.  The project was to sculpt an arm, rebuild the topology and bake out a normal map.  All in all if felt the project went fine.  I was happy with the overall sculpt and thought the topology came out nice, although I do feel that I could have been better.  The wrinkles in the hand could have come out a lot better  and the exaggeration kinda made he sculpt look stylized.  With the finger wrinkles I tried a few different things and wasn't really happy with any of the results.  

I did find building the base mesh in Zbrush much faster than I had first anticipated and I will use that technique on future projects.  One thing I would do differently next time is create some alphas of knuckles and wrinkles.  Sculpting them by hand didn't work and in one aspect of the project that could have been better.  

One issue that did pop up when working on this project was when I baked my normal map out.  The search distance "envlope" was to small hand keep showing black marks in the normal map.  Another issue was that when I applied my normal map the seems showed up, but after reading the Maya 2016 Doc's I found that you have to set the color space for normal maps to RAW in 2016.  

Dynamesh Basemesh

Created this base mesh using Zbrush. It started out as a sphere which I then dynameshed and by pushed and pulled it around I created the basic shape of the arm.


Arm Sculpt

After many hours of sculpting I finally felt the arm was finished.  I added a little bit of exaggeration to the sculpt; in hopes that it would make the detail more defined when I go to extracted the normal map.

Final Break Down

Here is an image of the base mesh, sculpted mesh and retopoed mesh with the normal map applied inside Maya.  I felt the retopoed mesh with the normal map holds strong resemblance to the sculpted mesh.